Fabric Wicking Test Procedure According to AATCC TM197
Introduction
Fabric wicking test is a crucial property of modern textile fabrics. For example, sportswear, activewear, and medical textiles should move sweat away from the skin. Various versions of the vertical fabric wicking test have been used to evaluate textiles for many years. In 2004, AATCC and ASTM International published a collection of unofficial industry procedures called the Technical Supplement. This test method is a more comprehensive and standardized version of the vertical wicking procedure published in the Technical Supplement. The original version of the test method included options for evaluating wicking rate at specified distances and times. The rate to specified time option was transferred to another test method, AATCC TM 197, in 2022.
You can read: Colorfastness to Water Test Easy Procedure AATCC 107
Objectives of Fabric Wicking Test
- The fabric wicking height test aims to assess the ability of fabric specimens to transport liquid vertically when a cut edge is immersed in liquid.
- Vertical wicking test measures the moisture transport ability of fabrics.
- Additionally, It helps to evaluate comfort properties.
- Moisture wicking test assesses the effectiveness of moisture-management finishes.
Principle of AATCC TM 197
The distance liquid travels along and/or through a fabric specimen from a cut edge is visually observed, manually timed and recorded at specified intervals. Fiber content, fabric construction, mechanical or chemical processing, or a combination of these factors may influence the movement of liquid along fabric. A short period of time (up to 20 mm) and a long period of time (up to 150 mm) is reported as wicking rates.
Apparatus
- Distilled or deionized water, 21 ± 2°C (70 ± 4°F)
- Stopwatch or digital timer.
- Surface tension meter, if using a liquid other than water
- Scissor jack, if using Erlenmeyer flask.
- Small straight pins
- Marking pens, fine-point, water soluble ink
- Measuring tape or ruler, mm graduations.
- Erlenmeyer flask, 500 mL; or rectangular pan, long enough to accommodate all specimens side-by-side.
- Means of suspending specimen(s) into a flask or pan
- Powder-free disposable gloves, e.g., latex or nitrile.
Fabric Wicking Test Procedure
Sample Preparation
- For sewn products, take specimens from different panels, at least 100 mm away from seams, pockets, plackets, and other assembly features. Specimens should be cut at least 100 mm from the selvage. Nonwoven fabrics should be spread out across the length and width of the sample so that different sets of yarns of different length and width are present.
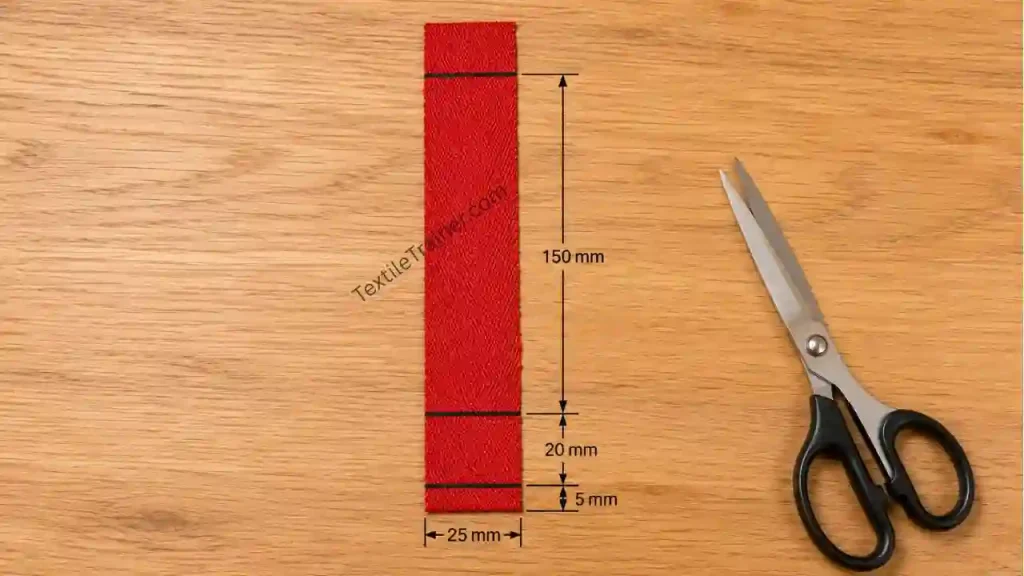
- The long dimension of specimens should be parallel to the fabric direction(s) being tested. Cutting the long dimension parallel to the fabric direction(s) is very important for repeatable testing. Cut 3 specimens, each 25 ± 3 mm wide and at least 165 mm long.
- Determine whether the specimen end needs to be submerged with a pin by cutting an extra specimen.
- Make a line across the width of each specimen on the fabric side to be tested, 5 mm from the end to be submerged. The line will represent how deep the specimen will be submerged at the start of the test.
- Then, A marking pen with soluble ink should be used to draw lines across the width of each specimen, at 20 ± 1 mm and 150 ± 1 mm above the first line.
- The wicking distance may be marked differently depending on the intended use of the fabric; when comparing results, make sure that all specimens are marked with the same wicking distance.
- In accordance with ASTM D1776, condition test specimens before testing.
Test Procedure
- Initially, ensure that the test is performed on a stable surface to minimize vibrations.
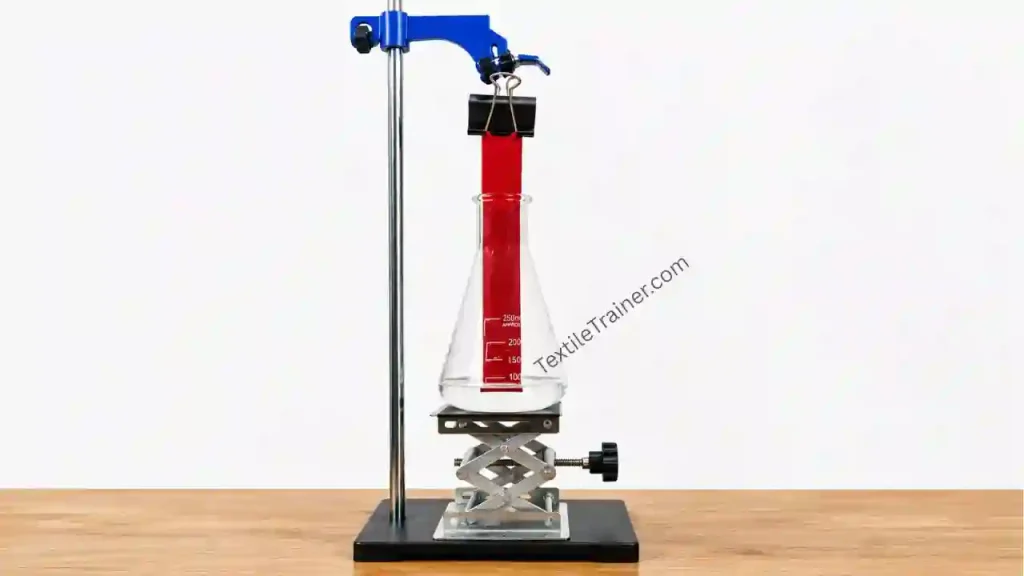
- Ensure that the lip and neck of the flask remain dry to prevent specimens from prematurely coming into contact with water in an Erlenmeyer flask. Add approximately 90 mL of water (or an alternate liquid) to the flask.
- A scissor jack is used to raise the flask and suspend the specimen above the water line. The specimen should hang perpendicular to the flask floor without folding or waves. Install a pin across the bottom end to secure the specimen.
- The jack should be raised until the speciman end is submerged to the 5-mm line.
- The bottom ends of specimens should be just above the pan floor when testing multiple specimens in a rectangular pan. Make sure that no specimen touches the pan. The specimens should hang perpendicular to the pan floor, without folding or waves. Insert pins as needed. Before adding water, ensure that the 5-mm line on each specimen is at the same level.
- Once the specimens are submerged to the 5-mm line, start a timer and carefully add water to the pan. Avoid pouring or splashing water on the specimens.
- Then, Observe the rise of the water, which may be evident from migration of the marking ink and/or darkening of the specimen(s). Record the time, to the nearest second, it takes for the soluble ink at the 20-mm line to begin to migrate. The wicking time for multiple specimens tested simultaneously in a rectangular pan may require multiple observers or timers to accurately record the wicking time. If the wicking is uneven across the specimen, note the highest point in the test report.
- Monitor the rise of the water and note down, to the nearest second, the time when the soluble ink begins to migrate at the 150-mm line. This is the long-period wicking time.
- Tests should be terminated when any of the following conditions is met:
- The water does not reach the 20-mm line within 300 seconds (5 minutes).
- The water does not reach the 150 mm line within 1,800 seconds (30.0 minutes).
- The 150-mm line wicks water.
- Note the time (s), distance (mm), and reason for termination of the test. Measure the distance the water has migrated.
- When testing in a flask, remove the specimen from the flask and repeat the procedure for the remaining specimens.
- For each specimen, use a clean flask filled with fresh water
Calculation
The following equation is used for vertical fabric wicking test:
- W=d÷t
- W= vertical wicking rate (mm/s)
- D=Wicking distance, mm( 20 for short period, 150 for long period)
- T= wicking time (s)
- The short-period wicking rate should be calculated to the nearest 0.1 mm/s for each direction tested.
- Determine the mean long-term wicking rate in each direction, to the nearest 0.1 mm/s.
- Calculate the standard deviation if desired
Conclusion
The fabric wicking test (AATCC TM 19) is an important test for determining the moisture transport properties of textile fabrics. The fabric wicking test measures the vertical movement of water through a fabric by capillary action. However, the article tried to present a simple explanation of the fabric absorbency test principle and the test working procedure. If you have any questions, let me know in the comment box below.
Read more test procedure: